日常备忘记录 1. Python 字符串前加u,r,b的含义
2. Pytorch item()方法
返回这个张量的值作为标准Python值。这只适用于只有一个元素的张量。(一般损失都用这个方法,loss.item())
1
2
3
>>> x = torch.tensor([1.0 ])>>> x.item()1.0
3. Pytorch view()和reshape()区别 相同点:都是将原张量元素重组为新的shape
不同点:reshape()限制更小,只要满足重组前后包含元素相同即可。view()有一些限制,例如,当tensor经过transpose()操作后,改变了tensor中的元素(比如交换了元素的位置),但是tensor在内存空间中的存储位置没有改变,那么变换后的tensor在内存空间中的存储就不连续了。此时view()方法不能直接使用。需要先调用contiguous(),使tensor的元素在内存空间中连续后,再调用view()方法。
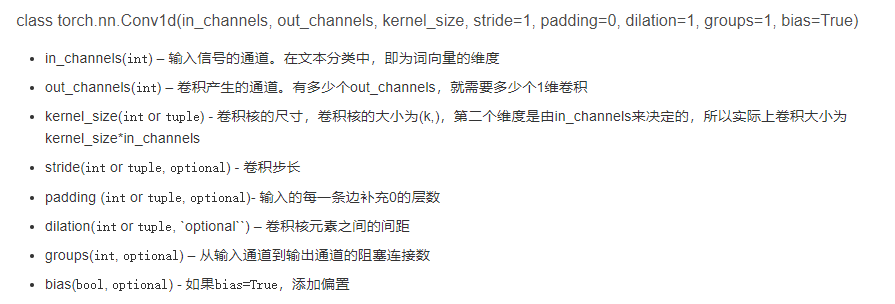
4. Pytorch Conv1d和Conv2d理解
1
2
3
4
5
6
7
8
import torch.nn as nnimport torchconv1 = nn.Conv1d(300 , 500 , 5 , 2 ) input = torch.ones((32 , 300 , 10 )) print(input) out = conv1(input) print(out)
注:kernel_size表示卷积核(过滤器)的大小,而filters表示过滤器的数量
Conv2d
5.神经网络不能求导的情况 网络不能求导的操作就是sample, 在sample的时候,可能是一个直接的概率分布,比如各个动作的概率,或者是一个概率分布的参数,比如VAE, 而造成不能求导的原因是输入和输出数据之间的直接关联性被打破,输入数据的变化,不能立马反映在输出结果上。即不是 continous operation.
只要是网络的操作固定,比如max pooling这样的,不管输入的数据怎么随机变化,总是有一个确定性的选择的过程。而sample是不行的,sample是对于一个概率分布的采用,采样的结果,和描述概率分布或者描述概率分布的参数之间没有直接对应的关系,感觉是这种没有直接对应关系的现状造成了不能求导,换句话说,输入和输出直接没有直接关系。但是max pooling这样的操作实际上是在输入数据集合里面做选择,输入数据和输出数据是具有直接关系的,即改变输入的值,能立马影响输出的值。而sample的话是不行的。
6.重参数技巧 sample操作会导致网络无法反向传播求导,因此重参数技巧就是为了解决该问题。
新的见解:Gumbel Softmax解决了两个问题,1)采样不均。2)梯度不可导。第一点通过添加Gumbel分布中采样的随机噪声。第二点则利用Softmax替代one_hot+argmax(已经证明,Gumbel Softmax可以等价于one_hot+argmax,当退火参数很小时)。对于梯度不可导这点,还有一种解决方法,通过利用强化学习的策略梯度。
通过以上操作,$\epsilon$控制随机性,而整体项可以反向传播求导。
1
2
3
4
5
6
7
8
9
10
11
12
13
14
15
16
class GumbelSoftmax (Layer) : """Gumbel Softmax重参数 """ def __init__ (self, tau=1. , **kwargs) : super(GumbelSoftmax, self).__init__(**kwargs) self.tau = K.variable(tau) def call (self, inputs) : epsilon = K.random_uniform(shape=K.shape(inputs)) epsilon = - K.log(epsilon + K.epsilon()) epsilon = - K.log(epsilon + K.epsilon()) outputs = inputs + epsilon outputs = K.softmax(outputs / self.tau, -1 ) return outputs gumbel_softmax = GumbelSoftmax() z_sample = gumbel_softmax(logits)
1
2
3
4
5
6
7
8
9
10
11
12
13
14
15
16
17
18
19
20
21
22
23
24
25
26
27
28
29
30
31
32
33
34
35
36
37
38
39
40
41
42
def onehot_from_logits (logits, eps=0.0 ) : """ Given batch of logits, return one-hot sample using epsilon greedy strategy (based on given epsilon) """ argmax_acs = (logits == logits.max(1 , keepdim=True )[0 ]).float() if eps == 0.0 : return argmax_acs def sample_gumbel (shape, eps=1e-20 , tens_type=torch.FloatTensor) : """Sample from Gumbel(0, 1)""" U = Variable(tens_type(*shape).uniform_(), requires_grad=False ) return -torch.log(-torch.log(U + eps) + eps) def gumbel_softmax_sample (logits, temperature) : """ Draw a sample from the Gumbel-Softmax distribution""" y = logits + sample_gumbel(logits.shape, tens_type=type(logits.data)) return F.softmax(y / temperature, dim=1 ) def gumbel_softmax (logits, temperature=1.0 , hard=False) : """Sample from the Gumbel-Softmax distribution and optionally discretize. Args: logits: [batch_size, n_class] unnormalized log-probs temperature: non-negative scalar hard: if True, take argmax, but differentiate w.r.t. soft sample y Returns: [batch_size, n_class] sample from the Gumbel-Softmax distribution. If hard=True, then the returned sample will be one-hot, otherwise it will be a probabilitiy distribution that sums to 1 across classes """ y = gumbel_softmax_sample(logits, temperature) if hard: y_hard = onehot_from_logits(y) y = (y_hard - y).detach() + y return y
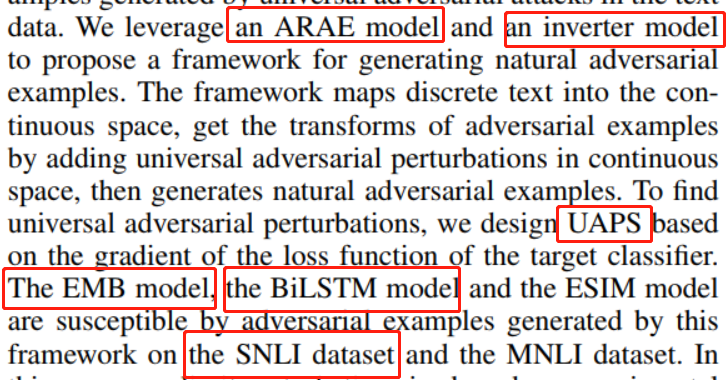
6. 论文中不定冠词和定冠词的使用情况
7.python __getitme__(self,key)方法 凡是在类中定义了这个__getitem(self,key)__方法,那么它的实例对象(假定为p),可以像这样
p[key] 取值,当实例对象做p[key] 运算时,会调用类中的方法__getitem__(self,key)
一般如果想使用索引访问元素时,就可以在类中定义这个方法(__getitem__(self, key) )
1
2
3
4
5
6
7
8
9
10
11
12
13
14
class Test : def __init__ (self,key,value) : self.key = key self.value = value self.d = {self.key:self.value} def __getitem__ (self,key) : return self.d.get(key,"default" ) t = Test(0 ,"123" ) print(t[0 ]) >>>default print(t[1 ]) >>>123
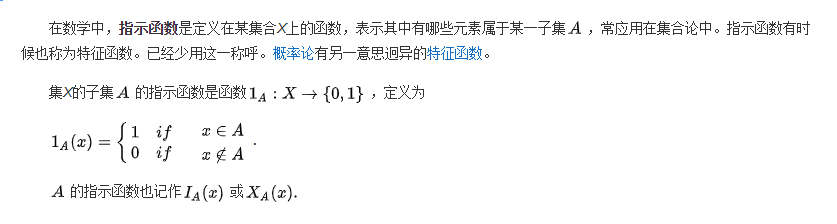
8. 指示函数
9. python yield 它首先是个return,普通的return是什么意思,就是在程序中返回某个值,返回之后程序就不再往下运行了。看做return之后再把它看做一个是生成器(generator)的一部分(带yield的函数才是真正的迭代器)
1
2
3
4
5
6
7
8
9
10
11
def foo () : print("staring..." ) while True : res = yield 4 print("res: " , res) g = foo() print(next(g)) print("*" *40 ) print(next(g))
1
2
3
4
5
staring... 4 **************************************** res: None 4
运行顺序:
1)因为foo()函数中有yield关键字,所以foo()函数不会执行,而是先得到一个生成器g
2)调用next()函数后,执行fool()函数,因此首先输出staring。当程序执行到yield时,类似于return,程序直接将4作为返回值,因此4是print(next(g))的输出
3)执行print("*"*40)
4)再次调用next()时,程序直接从res=yield 4开始执行。由于res并没有被赋值(等号右边的值已经被return了),因此print("res: ",res)输出为None
5)由于是wile True,因此程序继续执行,执行到yield 4时,类似于return,程序直接将4作为返回值,因此输出4
10. python 匿名函数 正常函数
1
2
def f1 (ar1, ar2) : return ar1 + ar2
匿名函数
1 f1 = lambda ar1,ar2: ar1 + ar2
11. python zip() zip() 函数用于将可迭代的对象 作为参数,将对象中对应的元素打包成一个个元组 ,然后返回由这些元组组成的列表 。
如果各个迭代器的元素个数不一致,则返回列表长度与最短的对象相同
1
2
3
4
5
a = [1 , 2 , 3 ] b = [4 , 5 , 6 ] zipped = zip(a, b) print(list(zipped))
1 [(1, 4), (2, 5), (3, 6)]
利用*号操作符,可以将元组解压为列表。
1 print([i for i in zip(*zipped)])
12. python 迭代器输出问题 在print()输出函数下,迭代器只能输出一次。通过移动指针来消耗一个缓冲区,随时读取。如果已经读过一次,那么指针就在缓冲区的末尾,读取到的就是空的。
1
2
print([i for i in zip(*zipped)]) print([i for i in zip(*zipped)])
1
2
[(1, 2, 3), (4, 5, 6)] []
1
2
3
z = list(zip(*zipped)) print([i for i in z]) print([i for i in z])
1
2
3
4
(1, 2, 3) (4, 5, 6) (1, 2, 3) (4, 5, 6)
13. numpy range()和arange()区别 range(start, end, step),返回一个range.object(迭代值),起始值为start,终止值为end,但不含终止值,步长为step。只能创建int型list。
这是一个通用的函数来创建包含算术级数的列表。它最常用于for循环。参数必须是纯整数。step参数,则默认为1。如果省略start参数,则默认为0。完整的形式返回一个普通整数列表。 step是正数,最后一个元素是小于停止的最大元素; 如果step是负数,最后一个元素是大于stop的最小元素; 步骤step不能为零(否则报错)。
1
2
3
4
a = range(1 ,5 ,2 ) print(list(a),type(a)) a= range(2 ) print(list(a),type(a))
1
2
[1, 3] <class 'range'> [0, 1] <class 'range'>
np.arange(start, end, step),与range()类似,也不含终止值,但是返回一个array对象。需要导入numpy模块(import numpy as np或者from numpy import*),并且arange可以使用float型数据。
在半开区间[start, stop)内产生值 (换句话说,包括开始但不包括停止的区间)。对于整数参数,该函数等同于Python内置的范围函数,但返回一个ndarray而不是一个列表。
1
2
3
4
5
6
7
8
import numpy as npa = np.arange(1 , 5 , 2 ) print(a, type(a)) a = np.arange(2 ) print(a, type(a)) a = np.arange(1.1 , 5.1 , 2 ) print(a, type(a))
1
2
3
[1 3] <class 'numpy.ndarray'> [0 1] <class 'numpy.ndarray'> [1.1 3.1] <class 'numpy.ndarray'>
14. python Iterable(可迭代的)对象,Iterator(迭代器)
凡是可作用于for循环的对象都是Iterable类型;
凡是可作用于next()函数的对象都是Iterator类型,它们表示一个惰性计算的序列;
集合数据类型如list、dict、str等是Iterable但不是Iterator,不过可以通过iter()函数获得一个Iterator对象。
15. pytorch expand()和repeat()
expand():扩展(expand)张量不会分配新的内存 ,只是在存在的张量上将一个大小(size)等于1的维度扩展到更大的尺寸。扩展维度必须与张量维度一致,并且只能扩展size为1的维度。
1
2
3
4
5
6
7
8
9
10
import torcha = torch.ones(size=(2 ,3 ,1 )) b = b.expand(-1 ,-1 ,3 ) print(b.size()) c = a.expand(2 ,3 ,3 ) print(c.size()) print(a) print(b) print(c)
1
2
3
4
5
6
7
8
9
10
11
12
13
14
15
16
17
18
19
20
21
22
23
torch.Size([2, 3, 3]) torch.Size([2, 3, 3]) tensor([[[-0.7531], [-0.3914], [ 1.8335]], [[-0.5702], [-0.0542], [-0.2949]]]) tensor([[[-0.7531, -0.7531, -0.7531], [-0.3914, -0.3914, -0.3914], [ 1.8335, 1.8335, 1.8335]], [[-0.5702, -0.5702, -0.5702], [-0.0542, -0.0542, -0.0542], [-0.2949, -0.2949, -0.2949]]]) tensor([[[-0.7531, -0.7531, -0.7531], [-0.3914, -0.3914, -0.3914], [ 1.8335, 1.8335, 1.8335]], [[-0.5702, -0.5702, -0.5702], [-0.0542, -0.0542, -0.0542], [-0.2949, -0.2949, -0.2949]]])
repeat(): 重复,沿着特定的维度重复这个张量。得到的张量size=原始张量size*重复size
1
2
3
4
5
6
7
8
9
10
import torcha = torch.randn(size=(2 ,3 )) b = a.repeat(1 ,2 ) c = a.repeat(2 ,2 ) print(b.size()) print(c.size()) print(a) print(b) print(c)
1
2
3
4
5
6
7
8
9
10
torch.Size([2, 6]) torch.Size([4, 6]) tensor([[-1.0002, -1.3370, 0.3203], [-0.4647, -1.8016, -0.3442]]) tensor([[-1.0002, -1.3370, 0.3203, -1.0002, -1.3370, 0.3203], [-0.4647, -1.8016, -0.3442, -0.4647, -1.8016, -0.3442]]) tensor([[-1.0002, -1.3370, 0.3203, -1.0002, -1.3370, 0.3203], [-0.4647, -1.8016, -0.3442, -0.4647, -1.8016, -0.3442], [-1.0002, -1.3370, 0.3203, -1.0002, -1.3370, 0.3203], [-0.4647, -1.8016, -0.3442, -0.4647, -1.8016, -0.3442]])
16. python extend(),append()
extend():在列表末尾一次性追加另一个序列中的多个值append(): 在列表末尾添加新的对象
1
2
3
4
5
6
a = [1 , 2 , 3 ] b = a.copy() a.extend([4 , 5 , 6 ]) print(a) b.append([4 , 5 , 6 ]) print(b)
1
2
[1, 2, 3, 4, 5, 6] [1, 2, 3, [4, 5, 6]]
17. pytorch stack() 1 2 torch.stack(tensor:连接的张量序列, dim=0 )
1 2 3 4 5 6 7 import torcha = torch.tensor([[1 , 2 , 3 ], [4 , 5 , 6 ]]) b = torch.tensor([[7 , 8 , 9 ], [10 , 11 , 12 ]]) c0 = torch.stack([a, b], dim=0 ) c1 = torch.stack([a, b], dim=1 ) print(c0) print(c1)
1 2 3 4 5 6 7 8 9 10 tensor([[[ 1, 2, 3], [ 4, 5, 6]], [[ 7, 8, 9], [10, 11, 12]]]) tensor([[[ 1, 2, 3], [ 7, 8, 9]], [[ 4, 5, 6], [10, 11, 12]]])
dim=0时, c = [ a, b]
dim=1时, d = [ [a[0] , b[0] ] , [a[1], b[1] ] ]
dim=2时, e = [ [ [ a[0] [0], b[0] [0] ] , [ a[0] [1], b[0] [1] ] , [ a[0] [2],b[0] [2] ] ] ,
[ [ a[1] [0], b[1] [0] ] , [ a[1] [1], b[0] [1] ] , [ a[1] [2],b[1] [2] ] ] ]
18. pytorch nn.LayerNorm() 1 2 3 4 torch.nn.LayerNorm( normalized_shape: Union[int, List[int], torch.Size], eps: float = 1e-05 , elementwise_affine: bool = True )
公式:$y=\frac{x-E[x]}{\sqrt{Var[x]+\epsilon}}*\gamma+\beta$
$E[x]=\frac{\sum_{i=1}^nx_i}{n}$
$Var[x]=\sqrt{\frac{\sum_{i=1}^n(x_i-E[x])^2}{n}}$
$E[x]$均值和$Var[x]$方差分别在最后几个维度计算,这些维度是由normalized_shape指定。
如果elementwise_affine=True,即开启仿射变换,则$\gamma$(初值是[1.,1., …]),$\beta$(初值是[0.,0., …])加入计算。这两个变量会在反向传播时得到更新。反之,则不加入计算中,即只做归一化操作,不会进行放射变换。
1 2 3 4 5 6 7 8 9 10 11 12 13 14 15 16 17 18 19 20 import torchimport torch.nn as nnbatch_size = 3 num_features = 2 features_shape = (3 , 4 ) feature_map = torch.ones(features_shape) feature_maps = torch.stack([feature_map * (i + 1 ) for i in range(num_features)], dim=0 ) feature_maps_bs = torch.stack([feature_maps for i in range(batch_size)], dim=0 ) ln = nn.LayerNorm(feature_maps_bs.size()[1 :], elementwise_affine=True ) output = ln(feature_maps_bs) print("Layer Normalization" ) print(feature_maps_bs.shape) print(ln.weight.shape) print(feature_maps_bs[0 , ...]) print(output[0 , ...])
1 2 3 4 5 6 7 8 9 10 11 12 13 14 15 16 17 Layer Normalization torch.Size([3, 2, 3, 4]) torch.Size([2, 3, 4]) tensor([[[1., 1., 1., 1.], [1., 1., 1., 1.], [1., 1., 1., 1.]], [[2., 2., 2., 2.], [2., 2., 2., 2.], [2., 2., 2., 2.]]]) tensor([[[-1.0000, -1.0000, -1.0000, -1.0000], [-1.0000, -1.0000, -1.0000, -1.0000], [-1.0000, -1.0000, -1.0000, -1.0000]], [[ 1.0000, 1.0000, 1.0000, 1.0000], [ 1.0000, 1.0000, 1.0000, 1.0000], [ 1.0000, 1.0000, 1.0000, 1.0000]]], grad_fn=<SelectBackward>)
$E[x]=1.5,Var[x]=(0.5)^2$
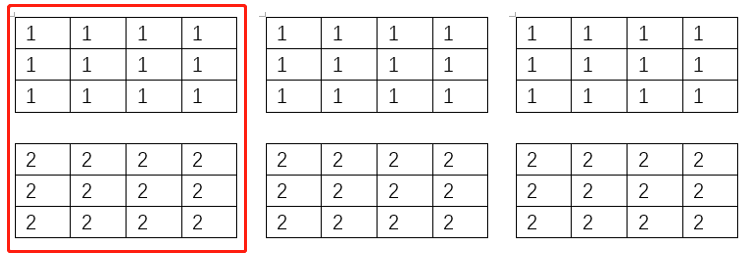
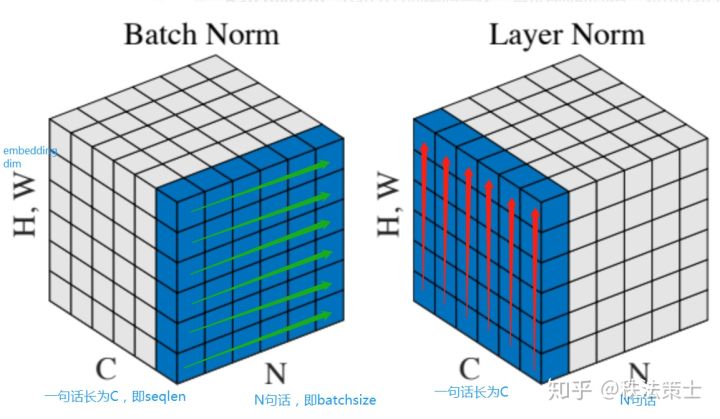
19. Pytorch 详解BatchNorm和LayerNorm差别 图像:(N,C,H,W) N表示batch_size,C表示通道数量,H表示图像的高,W表示图像的宽
文本:(N,C,H,W) N表示batch_size,C表示seq_len,H,W表示embedding_size
BatchNorm是在(N)batch_size维度上进行归一标准化操作。从图中可以看出,BatchNorm是将一个Batch中的每一个文本的每一个词(图中可以理解为第一个词)的词向量的第一个维度进行归一标准化。由于一个Batch中文本的长度不一定相同,会有很多的文本中有padding,从而导致影响归一标准化的精确度。因此,BatchNorm不太适合与文本。
LayerNorm是在(H,W)embedding_size维度上进行归一标准化操作。从图中可以看出,LayerNorm是将文本中的每一个词的词向量进行归一标准化。不难发现,它并不受Batch的影响,其操作其实就是实施在神经网络的一层上,因此被称为LayerNorm。
20. python strip() strip()用于移除字符串头尾指定的字符或字符序列
1 2 3 4 5 6 7 8 a = 'aThis is an apple .a' print(a.strip('a' )) b = ' This is an apple .' print(b.strip()) c = ' This is an apple .' print(c.strip('This' )) d = 'This is an apple .' print(d.strip('This' ))
1 2 3 4 This is an apple . This is an apple . This is an apple . is an apple .
21. 标准差(SD)和标准误差(SE) 方差:$s^2=\frac{\sum_{i=1}^n(x_i-E[x])^2}{n}$
SD:$\sigma=\sqrt{\frac{\sum_{i=1}^n(x_i-E[x])^2}{n}}$
SE:$\sigma_n=\frac{\sigma}{\sqrt{n}}$
标准差表示样本数据的离散程度。
标准误差表示抽样的误差(精密度)。
22. 验证集作用 作用:为了调整超参数
来源:从训练集中采样
模型训练、测试完整过程:
例子:当数据集比较小时,采用交叉验证 方法可以“充分利用”有限的数据,找到合适的模型参数,防止过拟合
作用:数据集小时防止过拟合。找到合适模型参数。
方法:将数据集分成N份 ,将N-1份 作为训练集,剩余1份 作为验证集。使用以上N种情况的训练集训练模型得到模型的参数。
结果:依据损失函数选择最优模型和参数。
23. Pytorch的dim理解 只有dim指定的维度是可变的,其他维度都是固定不变的dim = 0,指定的是行,那就是行变,列不变,理解成:同一列中每一行之间的比较或者操作
例子:
1)torch.argmax():得到最大值的序号索引
1 2 3 4 5 6 a = torch.rand((3 , 4 )) print(a) b = torch.argmax(a, dim=1 ) print(b) c = torch.argmax(a, dim=0 ) print(c)
1 2 3 4 5 tensor([[0.0321, 0.0604, 0.8718, 0.0475], [0.0723, 0.9482, 0.3159, 0.4461], [0.4151, 0.7802, 0.7472, 0.5297]]) tensor([2, 1, 1]) tensor([2, 1, 0, 2])
2)torch.sum():求和
1 2 3 4 5 a = torch.arange(0 , 6 ).view(2 , 3 ) print(a) print(a.sum()) print(a.sum(dim=0 )) print(a.sum(dim=1 ))
1 2 3 4 5 tensor([[0, 1, 2], [3, 4, 5]]) tensor(15) tensor([3, 5, 7]) tensor([ 3, 12])
3)torch.cumsum():累加
1 2 3 4 a = torch.arange(0 , 6 ).view(2 , 3 ) print(a) print(a.cumsum(dim=0 )) print(a.cumsum(dim=1 ))
1 2 3 4 5 6 tensor([[0, 1, 2], [3, 4, 5]]) tensor([[0, 1, 2], [3, 5, 7]]) tensor([[ 0, 1, 3], [ 3, 7, 12]])
24. Pytorch的*,matmul,mm,bmm 矩阵A,B, A*B,即点乘(dot),要求矩阵A,B的维度必须相同
例子:
1 2 3 4 5 6 7 8 9 10 11 12 13 14 15 16 17 18 19 a_23 = torch.arange(0 , 6 ).view(2 , 3 ).type(torch.LongTensor) a_batch_123 = torch.arange(0 ,6 ).view(1 ,2 ,3 ).type(torch.LongTensor) b_32 = torch.ones((3 , 2 )).type(torch.LongTensor) b_23 = torch.ones((2 , 3 )).type(torch.LongTensor) b_batch_132 = torch.ones((1 ,3 ,2 )).type(torch.LongTensor) dot = a_23 * b_23 ma = torch.matmul(a_23, b_32) mm = torch.mm(a_23, b_32) bmm = torch.bmm(a_batch_123, b_batch_132) print("a_23 " , a_23) print("b_32 " , b_32) print("b_23 " , b_23) print("dot " , dot) print("matmul " , ma) print("mm " , mm) print("bmm " , bmm)
1 2 3 4 5 6 7 8 9 10 11 12 13 14 15 a_23 tensor([[0, 1, 2], [3, 4, 5]]) b_32 tensor([[1, 1], [1, 1], [1, 1]]) b_23 tensor([[1, 1, 1], [1, 1, 1]]) dot tensor([[0, 1, 2], [3, 4, 5]]) matmul tensor([[ 3, 3], [12, 12]]) mm tensor([[ 3, 3], [12, 12]]) bmm tensor([[[ 3, 3], [12, 12]]])
25.下载Huggingface 的预训练模型并进行加载 这里以加载Bert-based-uncased (忽略大小写信息,所有文本都转为小写)模型为例,通过[链接]: https://huggingface.co/bert-base-uncased下载预训练模型(下载三个文件`config.json` , pytorch_model.bin,vocab.txt),并将下载好的文件存储到本地,然后通过下方代码即可加载Ber模型。
1 2 3 4 5 6 7 8 9 10 11 from transformers import BertModel, BertTokenizermodel_name = '路径\\bert_based_uncased' tokenizer = BertTokenizer.from_pretrained(model_name,do_lower_case=True ) model = BertModel.from_pretrained(model_name, return_dict=True ) model.eval() inputs = tokenizer("the" , return_tensors="pt" ) outputs = model(**inputs) last_hidden_states = outputs.last_hidden_state print(last_hidden_states.size())
15.ubuntu下切换cuda版本